Friday, April 27, 2007

Lasang Pinoy 17: Salted Eggs


This topic about eggs really got me egg-cited. Eggs, are no doubt a perfect food. An essential ingredient in every kitchen, they are inexpensive, available at any time of year, nutritious, easy to prepare, and can be added to just about anything you're cooking.

Growing up in a farm, my siblings and I have lots of fond memories about eggs. The most vivid and probably exciting was that of "stealing" them from the nest (made from old baskets we call kaing, in Pampango), while the hen was still incubating them. Another one was discovering ducks' eggs under the haystack, or in a dark corner of the barn concealed under rubbish, or under piles of used bamboo poles where predators, meaning, dogs and children, wouldn't notice. Likewise, finding tiny quail eggs in equally small nests nestled in between rice stalks in the middle of a rice paddy, really thrilled us. But what was amazing for us as children then was my father showing us how to cook eggs in a different way--wrapping them in clay and throwing them in a bonfire. After a few minutes, when the clay had dried and had visible cracks, the egg inside was ready.

And of course pleasant memories about how eggs are used in Filipino foods also abound, like the sinful leche flan during town fiesta or Christmas season, the soft and still warm bibingka topped with salted eggs and grated coconut meat during the misa de gallo, spanish omelette in the morning and of course, balut, penoy, red, salted eggs, etc. etc.

Indeed, there are endless ways we could prepare eggs, but for this Lasang Pinoy 17, I would choose salted eggs.

Food we grew up with would always have a special place in our tummy, you know, so even the nicest and yummiest pasta dish would not beat the satisfaction you get from eating salted eggs, ripe fresh tomato, slices of green mango and steamed rice wrapped in fragrant banana leaves.

I remember, the last days of classes during my primary school years were always fun. Our teacher/adviser would tell us to bring our lunch to school so we could all have lunch together inside the classroom. I normally would have lunch at home on ordinary days because school was just a few minutes walk from home. Aside from that, I felt miserable eating a cold meal during lunch time. For that "special" last day of classes, I would bring my lunch to school, which would often be steamed rice wrapped in banana leaves and at the center of it was a shelled salted egg and a very ripe, fresh tomato. If I was lucky and pico mangoes were on sale, I would buy one from the public market on my way to school.

As a teen-ager, the salted egg also figured in our picnics with friends, especially if the invitation was sent on a short notice. Salted eggs were always available, they do not spoil easily, were easy to prepare and very cheap compared to meat, so they would almost always be included in our picnic baskets.

Some two months ago I chanced upon huge geese salted eggs at a farmers' market here and didn't think twice about buying two because for several days prior to that I had been craving for salty eggs with ripe tomatoes. The eggs were huge, probably twice the size of a medium-sized hen's egg. Not satiated with just two, I decided I would try doing them myself so I asked from among my friends for a recipe for salted eggs. I got one and this was what I used for my salted eggs using chicken eggs.

Salted Eggs

1 1/2 c Rock salt
4 c Fresh water
12 Fresh eggs, preferably duck eggs


Bring water and rock salt to a boil. Let cool. Place eggs in a crock or glass jar. Cover the eggs with the salt-water mixture. Let stand in a cool place for 21 days. Remove eggs from salt bath and store them in the refrigerator if not ready to use immediately. Yolks should be a bright yellow-orange color and quite firm. The white should be slightly cloudy and still runny. Eggs without a firm yolk should be discarded. To hard cook, cover with fresh cold water and simmer for 20 minutes.

Maybe I was too excited or too anxious that the recipe would not turn out right, or the eggs would become overly salty, so I tried one after 15 days. The egg yolk was allright, it had a nice color to it, the white was not too bad either, but it was not as salty as the ones commercially sold. So I waited six more days and the result was satisfying. Needless to say, I had a feast!

Sunday, April 22, 2007

New Zealand grown ampalaya

I finally had bittermelon fruits from the vine I planted October last year. Actually, this was the last one. I picked three others some weeks ago and was quite pleased, but not too happy about them as they are so tiny compared to the bittermelon we grew in Pampanga. But since it's autum and the temperature has gone really low these days, I worry that the frost would beat me to my bittermelon so i also picked some of the leaves. These will be nice in sauted mung beans soup later this week. Well, semblance of food from home.

Saturday, February 24, 2007

Pancit Bihon with Bittermelon and sardines

I chanced upon some ampalaya (bitter melons) in one of the Chinese stalls at the Riverside Farmers' Market last Saturday and decided to buy a piece which cost me three dollars. I had given up hope of producing my own ampalaya this year because to this day, the bitter melon vine I planted last October (which I kept well-watered and well-fed under the hothouse), hasn't produced any single fruit. It was a well-looked after plant, maybe even "spoiling" it with organic fertilizer once a week and making sure it is protected from any predator insects. In return, it grew lush, healthy leaves and the vine has almost filled the length of the hothouse. I was excited seeing its first bud burst in January, although it was quite late considering that it's been four months since I planted it. I anticipated to pick the first bitter melon fruit in February, but to my dismay, the first bud which was just about an inch long, turned yellow just as February was about to start. There were lots of buds that sprouted since then, but the same thing happened - they wilted just as soon as their flowers dried. Not a single fruit survived. And autum has set in, meaning colder temperature which the ampalaya wouldn't like. So last week, I picked all the young leaves and cooked them into a bitter soup with lots of tomatoes in it.

Anyway, I decided to use the bitter melon I bought in a recipe called, "Pancit Bihon with Bittermelon and sardines" or "Pancit Bihon Maki Apalya at Sardinas" in Pampango. You probably have not heard of this dish, but this is one pancit recipe from our barrio whose main produce back then was bitter melon. It's a farmer's recipe. It's something my mother would prepare as soon as the first few fruits of our bitter melon plants are ready for picking. These first few fruits, which develop near the base of the vine are called "bungang pun" in Pampango or first fruits. These are plump and short and are not too bitter. For farmers back then, the sardines is the most readily available ingredient, especially if you live far from the market place. Toiling in the farm from sunrise to sundown gave little time for us then to do our shopping (which would have to be in the next town) as vegetables are a very demanding crops. Sardines and bihon can be bought from the neighborhood sari-sari store at a very cheap price, whereas, if you wanted shrimps and pork to go with your bittermelon, you have to go to the next town's producer's market.

To cook this dish you will need:

1/4 kg bihon
1/2 kg ampalaya sliced thinly
1 tin of sardines
2 cloves garlic crushed
1 cup chopped tomatoes (optional)
1 medium sized onion thinly sliced
2 tbsp cooking oil
salt to taste
1 cup water

Soak bihon in tap water until soft. Heat oil in a wok. Add garlic, onion and tomatoes. Pour the sardines then add water. Simmer for 5 minutes. Add the bitter melon. Boil until bitter melon has turned a nice green color. Remove from the pan. Add more water if needed, then add the bihon. Cover the pot until bihon is cooked. Return the sardines and tomato mixute into the pan and mix well. Serve warm.

Monday, January 8, 2007

Salted eggs


I found these huge, salted geese eggs at a farmers' market in Lower Hutt last Saturday. I was so pleased because for days, I've been craving for salted eggs.

Nostalgia. The last days of classes during my primary school years were always fun. Our teacher/adviser would tell us to bring our lunch to school so we could all have lunch together inside our classroom. We normally had lunch at home on school days because school is just a few minutes walk from home. Aside from that, I feel miserable eating a cold meal at lunch time. And because there were no jollibees yet during those days, students' lunches would almost always be steamed rice with deep fried bangus belly with ripe, fresh tomatoes, or fried chicken/pork chop, adobo chicken/pork, etc. It was proper food, you know. Nothing from fast foods. Some years, I would have steamed rice wrapped in banana leaves and at the center of it was a shelled salted egg and a very ripe, fresh tomato. If I was lucky and pico mangoes were on sale, I would buy one from the public market on my way to school, or else, I made do with the indian mango.

The salted egg also figured in our picnics with friends, especially if the picnic was just a spur-of-the-moment decision. Salted eggs were always handy - they do not spoil easily, are easy to prepare and very cheap compared to meat.

Food we grew up with would always have a special place in our tummy, you know, so even the nicest and yummiest pasta dish would not beat the satisfaction you get from eating salted eggs, ripe fresh tomato, slices of green mango and steamed rice wrapped in fragrant banana leaves.

Thursday, January 4, 2007

Stuffed Marrow

Zucchini and marrow
Last year, we had a bumper crop of golden zucchini and we tried several recipes using this. We made zucchini pickles, zucchini fritters, zucchini and mint soup, zucchini this and zucchini that. This year, we decided that we want the green one. Zucchinis are fantastic to have in the garden - they are easy to grow and need little attention. But not when they have begun fruiting because the zucchinis seem to grow vigorously and could become marrows overnight.
Two weeks ago, we noticed an overgrown zucchini and so allowed it some more days of sunshine before we decided to pick it. David suggested that we stuff the marrow and bake it like we did with the yellow marrow last year. The recipe is called Stuffed Marrow which was from the book "The Cooks' Garden" by Mary Brown, Helen Leach and Nancy Tichborne.
For this recipe, you will need a large vegetable marrow (1.5 kg). Cut it evenly in half and use a spoon to remove the seeds and the soft pulp inside.


For the stuffing:

1 small onion chopped
2 tbs butter
250 g mince
60 g fresh mushrooms chopped
1 tb chopped parsley
1/2 tsp chopped thyme
50 g soft breadcrumbs
freshly-ground black pepper
1/2 tsp salt
1 small egg
2 tbs butter, melted

Melt the butter in a frying pan, add the onion and saute for a few minutes. Add the mince and mushrooms and continue to cook until browned. Remove from the head. Add the remaining ingredients except for the melted butter. Mix thoroughtly with a fork.


Pack the stuffing carefully into the marrow. Place in a large roasting pan and brush with melted butter. Cover with a piece of foil. Bake at 190 degrees. A large marrow will need 1 1/2 hours and a small one will need 45 minutes in the oven,
Serve with Neapolitan sauce.


Neapolitan sauce
250 g ripe tomatoes, peeled and chopped
2 cloves garlic finely chopped
salt and freshly-ground black pepper to taste
1 tb cooking oil
1 tsp chopped basil or parsley

Saute the tomatoes, garlic and seasoning in oil for a few minutes. Do not allow the tomatoes to become pulpy as the fresh taste will be lost. Add basil or parsley and serve with the stuffed marrow.

This sauce also goes well with spaghetti and topped with grated cheese.

Friday, December 29, 2006

Suman


Suman is another native delicacy that we associate with the festive Christmas season. Or at least in the farming village where I grew up. Rice being abundant in our place, different delicacies with rice as the main ingredient were almost always present on our noche buena feasts--kalame ube, kalame nasi, tibok-tibok, tamales, puto, suman, kutsinta, etc.
This suman I am telling you about is what we call suman tili in Pampango and is made of glutinous rice half-cooked in coconut milk and sugar then rolled in banana leaves. The resulting cylindrical suman - sometimes the size of cigars - are then boiled for hours to complete the cooking process.
Frozen banana leaves 
Last November, I was just too happy to find the newly-opened Filipino Mart in Lower Hutt selling banana leaves among other Filipino food items. The banana leaves were frozen and cost quite a lot if you're thinking in terms of its abundance where it came from. Yes, banana leaves are readily available back home that we almost always take it for granted. It is only when we want to use it but could not find it anywhere else that we realize how precious this thing is.

Fresh coconuts, are available here in bigger supermarkets, thanks to Samoa and Fiji islands who export the coconut in different forms - fresh, dried, dessicated or in tins. And glutinous rice sold here comes from Thailand.
The ingredients for this suman:

2 cups glutinous rice
1 cup sugar
4 cups coconut milk
pinch of salt (optional)
banana leaves

Preparing this suman is quite fiddly and tedious. First step is cutting and trimming the banana leaves in uniform size before wilting the pieces in fire (or boil them) for a wee while so they do not break when you roll the rice and do the folding. Next, the glutinous rice is washed and cooked with coconut milk in slow fire, careful not to burn the bottom of the pan as this will impart a burnt taste to your suman. Halfway through cooking, add the sugar. This is so because if sugar is added beforehand, the rice will never break and won't get cooked no matter how long you boil your suman. When cooler, a tablespoon or two (depending on the size of your banana leaves), is rolled onto the leaves. This too, needs skill because your suman may get flattened instead of having a nice cylindrical shape when rolling is not done properly. Pile the suman in a large wok or deep pot, add enough water and steam the suman for 30-45 minutes or until cooked according to your desired doneness.

This suman goes well with sabaw ng nilaga or tea during cold and balmy mornings.

HAPPY NEW YEAR EVERYONE!

Wednesday, December 27, 2006

Lasang Pinoy 16: Holiday Food Gifts (Tamales)


Several of my attempts at joining Lasang Pinoy's Food blogging event in the past failed, but this time, I am determined to finish this entry because I am raring to tell you all about our family's favorite Christmas food gift--the tamales. But first let me give you a brief introduction of this Pampango delicacy and its importance to our family.

The tamales is a native rice cake that is popular in Pampanga, especially in Bacolor where, the best tamales, they say, come from. It's an offshoot of the Mexican tamal (tamales is the plural form), which are packets of corn dough with a savory or sweet filling and typically wrapped in corn husk. I surmise that substitution of ingredients through the years, resulted in this Filipino version of the tamales.

Anyway, the tamales is cooked by mixing ground rice and coconut milk and thinned with water, then seasoned with powdered black pepper, anato seed water (for coloring) and salt. The mixture is cooked in slow fire until a certain consistency is reached, then when cooled is wrapped in squared banana leaves, topped with slivers of chicken meat cooked asado style, slices of boiled eggs and ground peanuts. The final product is then steamed for an hour or until it has settled and the tamales has taken shape. A melt-in-the-mouth tamales has a jelly like consistency after steaming, with a hint of green from the banana wrapping.

The tamales has become my mother's 'signature dish' and our Christmas wouldn't be complete without it on our noche buena table. Placed side by side with ham, queso de bola, roasted turkey or chicken on your dining table, the tamales would look very 'out of place', but to us, it is the 'star' of our noche buena feast, something we would always look forward to having during this festive occasion. Let me tell you why.

Father’s roots were from Bacolor, hence his fondness for tamales. When he and mother got married, they settled in nearby town, Sta. Rita. Mother knew how much Father missed the tamales. For love of him, Mother, who was the youngest among 12 siblings and who knew nothing about cooking, decided to learn how to make the tamales. But since it's such a tedious and fiddly job, she would only make them on special occasions like Christmas and included them on our Noche Buena feast.

However, the first Christmas she tried to make tamales was a disaster. Since she relied only on calculation for the ingredients, the resulting tamales were soggy and salty. Out of politeness, father ate the tamales and appreciated her efforts and good intention.

The following Christmas after that first attempt, she was armed with the measurements courtesy of her eldest sister. This time, there was an improvement. The tamales had the right taste, but were too firm, looking more like kalamay-wrapped-in-banana leaves instead of tamales. That was because she used newly-harvested rice. That was another lesson learned.

Since she would make a lot of tamales every time (five gantas of rice would yield 80-100 pieces of medium sized individually wrapped tamales), she would offer them to our relatives who would come visiting on Christmas day, and sometimes would send some more to those who did not come.

Determined to make the perfect tamales, mother would make her attempts Christmas after Christmas, and each year, registering an improvement. Until finally, she was able to come up with neither salty nor soggy, but melt-in-the-mouth and really delicious tamales. By this time we have become accustomed to having tamales on our noche buena feast, not to mention we have acquired the taste for this native kakanin. Even our relatives who come visiting would also ask her for more tamales. Every year thereafter, she would make lots of them a day before Christmas, anticipating more of our kins and later, some of our neighbors clamoring for her tamales. And thus, started a tradition of giving tamales as a Chirstmas food gift.

Five years ago, mother left us to be with our father who went ahead seven months earlier.

The very first Christmas as orphans was the saddest Christmas for all ten of us, their children. Needless to say, the first Christmas in years that the tamales was not on our dining table, and no tamales to offer to visiting relatives and friends.

Two years ago, our eldest sister, decided that we have to bring back the tamales tradition in remembrance of our mother. So, all of us women siblings set to work for that one goal--tamales on our Noche Buena feast. We were confident that years of observing mother cook tamales has taught us how to do it ourselves.

Unfortunately, our first tamales two Christmases ago, were soggy and salty.

Last year, our tamales were soggy but no longer salty. This Christmas, as I celebrated Christmas away from home, I tried to make some, but these too were not perfect.

Next Christmas, I will be home in Pampanga, and we are determined to make the perfect tamales for us and for our visiting relatives, the way Mother did them, with so much love and patience.

Lasang Pinoy 16

Lasang Pinoy, which could mean ‘tastes of something Filipino’ or short for ‘the Filipino taste’ is a monthly food blogging event to promote Filipino food. It is a product of e-mail brainstorming sessions of several Filipino food bloggers who thought it was time for a Filipino event in the tradition of Is My Blog Burning. The blogger organisers of Lasang Pinoy and participants strive to make the events reflective of Filipino culture.


Thursday, December 7, 2006

Zucchini Fritters


Zucchini Fritters

We had a good harvest of fruits and veggies from our garden last summer so I had to freeze most of it. So glad I did because fresh veggies are quite pricey during winter if they are available at all.

Anyway, now is the time to dig the freezer and make an inventory of frozen veggies for immediate use. Problem with frozen veggies, your choices of how to cook them are limited as they get really soggy when thawed. But that is a non issue.

So, first to come out from down under the cold were the grated zucchini and I decided to make zucchini fritters for lunch. Served warm with your favorite chutney, this dish will surely warm your cold, cold days.

Here's how to do them.

Ingredients:
1 1/2 cup grated zucchini
2 tablespoons minced onion
1/4 cup grated parmesan cheese
1/4 cup all-purpose flour
2 eggs
2 tablespoons mayonnaise
1/4 teaspoon oregano
Salt and pepper to taste
Vegetable oil for shallow frying

(If you're using fresh zucchinis, you don't have to thaw anything). So you can now squeeze the grated veggie using a clean cheesecloth to remove as much water as you can.

Mix together all the other ingredients except the oil to make the batter.

Heat oil in a skillet. Spoon batter--2 heaping tablespoons per patty--into skillet. Brown both sides.

Serve warm with your favorite chutney. Enjoy!
posted by Mel @ Wednesday, July 12, 2006

Tuesday, October 10, 2006

Ampalaya at last

Bitter Melon Stuffed with mince pork


For the past weeks my body was signaling that I had been indulging in too rich food. The sign? I was craving for bitter melons. I don't know why, but after having rich and greasy food day after day after day, I would always want to eat bitter melons. This stemmed from our belief that eating something bitter will help purge the system of any impurities. Problem was, bitter melons are not common in the area where we live. So it's been weeks since I started craving for this bitter veggie. Last week I was so desperate that I asked David if we could check that Asian food supermarket in Petone, some thirty minutes drive from our place to see if they had any. The store did carry it, albeit frozen and the label was marked, 'product of Vietnam". Oh well, ampalaya from anywhere else in the world will be just as bitter and good. I was happy to bring home a packet of three pieces, cleaned and pitted. I decided I would do 'relyenong ampalaya' since it's been ages since I last had this dish. So I stuffed two of them with cooked minced meat, rolled them in batter then shallow fried them. With ketchup and steaming white rice with, I had a feast! David did not like bitter melons so I had them all for myself.

Here's how to do relyenong ampalaya if you are interested: 

 Ingredients:
 2 -3 pieces ampalaya cut in half or quarter (depending on the length of your ampalaya) 
  batter (1 egg, 1 cup of flour, water) 
Oil for frying Ketchup Filling: 1 tbsp cooking oil 
3 cloves garlic 1 medium onion finely chopped 
1/4 kg minced pork 1/4 kg (or less) shrimps, shelled, chopped (optional) 
2 tbsp raisins salt and pepper to taste 1 small carrot shredded (optional) 
2 tbsp of chives chopped

Merhods:
 Boil the ampalaya pieces until half-cooked. Do not overboil as this will make them soggy. 
 Meanwhile, heat oil in wok and sautee garlic and onion. 
Add the minced pork. Add shrimps. Stir and make sure pork is no longer pink. 
Add carrots and raisins. 
Add chives just before removing from heat. 
 Dry the ampalaya and stuff them with the cooked filling.
 Coat them with batter then shallow fry them. Just before serving, cut each piece into 1 inch slices then serve with ketchup. Just remember when seasoning whatever you're cooking, go by your taste. Adjust any ingredient or alter if you must to suit your taste.

Saturday, August 5, 2006

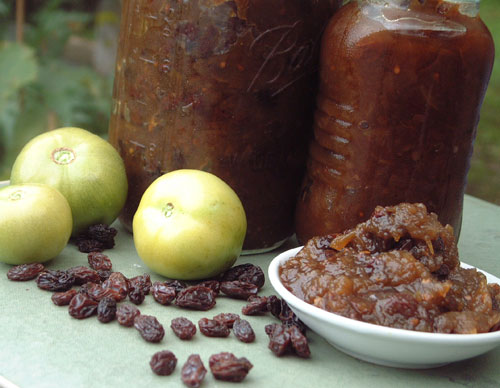
Green Tomato Chutney


We have yet to experience the first morning frost this year. although, temperatures have gone down to single digits. This means, winter is just a breath away and so, it's time to thank summer plants for a good harvest and do some clearing in the garden. Sad eggplants and stakes used for the runner beans had to be plucked out, kamote and jerusalem artichokes dug up for any tubers, and the remaining tomatoes still hanging on (mostly green) had to be picked and the wilting vines cut up for the compost heap.

A good problem again just came up--what to do with still green tomatoes. I suppose, I could just put them on a basket and wait for them to ripen. But no, there is a chance they would just rot and not ripen. I searched for ways to use green tomatoes and found lots of recipes. I was intrigued with the "Green Tomato Chutney" as I have never tried it. So I weighed, measured, chopped ingredients and turned on the stove.


From Mary Browne, Helen Leach and Nancy Tichborne's book, "The Cook's Garden", here's how to make use of green tomatoes.

GREEN TOMATO CHUTNEY.
Ingredients

1 kg green tomatoes
1kg cooking apples
500 g brown sugar
500 g onions
250 g raisins
1/2 teaspoon ground ginger
1 tsp mixed spice
1 tb salt
600 ml vinegar

Quarter the tomatoes and remove the hard cores. Peel, core and quarter the apples (I find grating the apples better so you eliminate coring). Peel the onions Chop all these ingredients finely. Place in a preserving pan and add the remaining ingredients. Bring to a boil and then simmer uncovered for 1-2 hours until the chutney is thick and well cooked. Stir occasionally, Pour into clean, sterilized jars.
Like our own achara (pickled green papapaya), this is a nice accompaniment for anything fried, and a great substitute for ketchup.
posted by Mel @ Monday, May 08, 2006 1 comments links to this post

Tuesday, May 9, 2006

Filifest 2006

Filifest 2006 A Celebration of Filipino Culture Wellington, New Zealand--Filipinos in the Wellington region and the South Wairarapa area, gathered together at The Little Theatre in Lower Hutt, to celebrate the 2nd Filipino Festival (Filifest 2006) laat April 1, 2006. Organized by the Wellington International Filipino Society (WIFS) headed by Ms Nilda Campbel, Ms Anita Mansell and Ms May Young, the annual event presented different regions of the Philippine islands, through songs and dances. Choreographed by Ms Gina Reid, (adapting the choreography of Dr Paz Cielo Angeles-Belmonte), the Filifest showcased young Filipino New Zealanders’ talents in singing and dancing. Highlights of the evening were dances from various Philippine regions, grouped into four: the Igorot Suite (Kayabang, Pinanyuan, Sayap and Bumayah); the Maria Clara Suite (Scarf Dance and Estudyantina); the Muslim Suite (Silong sa Ganding and Asik); and the Rural Suite (Subli, Binasuan, Sayaw sa Bangko, Sakuting, Maglalatik, Itik-itik, and Tinikling). Awed at seeing such amazing talents in the young performers, the Honorable Luamanuvao Winnie Laban, Minister for the Community and Volunteer Sector of New Zealand, advised the New Zealand Filipinos, especially the younger generation to “…hold on to your culture, learn your language and your dances…” Equally impressive was Master of Ceremony, Bless Sutherland from Christchurch, who delighted the audience with her hosting savvy and trivia about the history of each song and dance presented. Well-applauded number was the “Binasuhan sa Bangko”, a combination of “Sayaw Sa Bangko”, a dance native to the the barrio of Pangapisan, Lingayen, Pangasinan, which demands skills from its performers who must dance on top of a bench roughly six inches wide, and “Binasuan”, a colorful and lively dance from Bayambang, Pangasinan, which shows off the balancing skills of the dancers gracefully maneuvering glasses half-filled with rice wine. PHOTOS BY DAVID WOOD www.pixelpump.co.nz For more photos of the Filifest, visit: www.pixelpump.co.nz/photos_filifest06.php

Monday, April 24, 2006

Carboot sale (One fine autumn day)

I have always been interested in how car boot sales are being conducted. Several times, David and I planned to participate in the local one, (in fact, he has put together some old stuff--pre-loved things we could not find use for anymore--in a big box ready to go into the car boot any time), but the not-so-pleasant weather every time, would always prevent us from going. Last Sunday, we decided to go for a drive to Queen Elizabeth Park in Masterton, (a 30-minute drive from our place, Featherston), where we hoped to get some good photos of autum leaves, or at least of those fallen ones being tossed and turned by the autum breeze. On our way, we called by a mushroom farm and bought a box of huge, flat, fresh mushrooms! It was mid-morning when we reached Masterton but had to stop first at the car boot sale on Essex street. It was in a large vacant space where several cars' boots were opened and makeshift stalls were set up, and just about anything was on sale. Car boot sales, according to Mr. Google, "are a mainly British form of market in which private individuals come together to sell their unwanted household items". Since some of these people want to get rid of old stuff (like books, kitchen utentils, used toys, used clothes, pre-loved books, old tools, magazines, memorabilia, plants, herbs in pots, etc,) almost everything was sold at almost knockdown prices. In New Zealand, the car boot sale has evolved into a combination of a garage sale and a flea market, where not only private individuals who want to get rid of their unwanted household things participate but commercial sellers as well. Like, Jack, who was selling eggs from his chookie farm. When we found his car at around 10:30 a.m. he had already sold at least 40 trays of his eggs. It was also brisk business for a group who were selling fresh veggies like cabbages, water cress, carrots, potatoes, tomatoes, etc., which were unloaded from a truck in several plastic crates. Wandering around the area, we found several items of interest to us. David fancied a plate made of alluminum with interesting old photos of a lake in Queenstown printed on it. I was delighted to find an old couple who were selling at least four kinds of nuts harvested from their garden--chestnuts included. The chestnuts were not being "roasted on an open fire" though. They were fresh. Just the same, I bought a kilo for myself. David bought for me a pack of figs, a kind of fruit which has a bulbous shape with a small opening (the ostiole) in the end and a hollow area inside lined with small red edible seeds. I have never seen nor tasted this fruit before so he wanted me to give it a try. But I was more excited about my chestnuts (it's been years since I last had a taste), so soon as we arrived home, I tossed a handful into a pot and roasted them on the stove top. The old woman from whom we bought them told me to toss them for about ten minutes, so I did, humming "chestnuts roasting on an open fire...". It was just disappointing that they were not as fragrant as the ones we see being roasted in big woks in Quiapo or elsewhere during Christmas season. Anyway, they were still uncooked after ten minutes, and since the pot where I cooked them has burned at the base, I thought of just giving them a wee zap in the microwave. Which was a bigggg mistake! A few seconds after pressing the start button, the chestnuts started popping up like firecrackers being fired up, giving me a wee fright. Lesson learned, never, ever cook chestnuts in the microwave. Dinner that day was baked mushrooms, tomato soup and toast, plus popped chestnuts. Here's how to make those yummy, baked flat mushrooms: 4 flat mushrooms 4 tsp olive oil 4 tbp grated cheese Pre-heat oven to 220 degrees. Lay mushrooms upside down on a baking tray. On each piece, sprinkle a teaspoon of olive oil. Then top with grated cheese. Bake for 10 to 15 minutes. Serve hot. By the way, strolling at the Queen Elizabeth Park at this time of year is just amazing. Each time the wind blew, huge trees would let go a rain of leaves in red, gold and yellow, adding to the pile of already crisp, brown leaves that has carpeted the lawn. And as the winter season approaches, more leaves will let go of their hold on the twigs to give way to new growth next spring.

Wednesday, April 19, 2006

Feijoa (Also known as Pineapple Guava)


First to fall on to the ground were a couple of medium sized fruits from the tree by the veggie garden. That was March 27. Every day thereafter, we gather an average of one and a half kilos a day. Almost a month since then, we still gather as much amount of feijoa every day, but expect the quantity to gradually diminish until the feaijoa season ends in June.

The first time I saw a feijoa fruit in 2004, I got really excited because it looked very much like the guava, which I love and sorely miss to this day. I wasn't particularly impressed the first time I was introduced to its taste though. My husband, David, cut one feijoa in half and scooped the jelly-like pulp in the center and asked me to try it. It didn't taste too bad, but found it a little bland and unappealing. Or probably, because it looked like the guava, I was expecting a sweet taste with a hint of tartness that we find in most of our fruits back home. It did not meet my expectations so I did not give it another try that year to my husband's disappointment. He soooo loves the feijoa --on its own or with ice cream and whipped cream (!!!) and wished we would enjoy it together.

The following year, there were just too many fruits falling on to the ground, it was a pity I couldn't appreciate them. But David never gave up asking me to give it another try. So I did, to please him. But this time, instead of cutting it in half and scooping the jelly-like pulp, I peeled the thin skin, sliced it thinly and sprinkled a little salt like I would with guava or mango. And it worked! It tasted so much nicer than the first time I tried it. I have since been enjoying the feijoa with my husband, although, I still do not like it with my ice cream.

But here is a better way to enjoy feijoa:

250 gms feijoa peeled and chopped coarsely
1 cup milk
2 cubes glazed ginger (or a thumbnail size fresh ginger)
1Tbsp honey
2 cups cubed ice

Put everything together in a blender and process to a smoothie. Adjust sweetness according to taste.

Rich in Vitamin C with a sugar content of 6 percent, the feijoa usually falls on to the ground before it is ripe. So they have to be gathered and held in store until their flavor has fully developed. When the fruit has turned slightly soft and the jellied sections in the center becomes clear, (which may take 2 to 5 days after natural fruit drop), it is ready to be eaten. the feijoa is still unripe when the jelly-like pulp is still white, but past its best when it starts browning at the center.

I don't really know how to describe the taste, but the jelly like substance in the center of the fruit has a distinctive sweet/sour flavor and the flesh around it is granular and a bit tart. Its other name is "pineapple guava", and some say it has a rich, guava-like flavor with a hint of strawberry and pineapple, but I can't really tell.

Depending on its variety, the feijoa, which is about 5 centimeters long, may be oblong or round and looks very similar to the guava. It is green in color even when ripe, with a thin, tough, waxy skin. Cut in half, the fruit has white or yellow-green flesh around a jelly-like pulp, in which very tiny seeds are embedded. The feijoa, byt he way, is native to southern Brazil, northern Argentin,a western Paraguay and Urugua. In the 1920's it was intoroduced to New Zealand where it is now grown organically.
posted by Mel @ Wednesday, April 19, 2006 4 comments links to this post